I’m always interested in not just the language we use to communicate but the cultural ideas behind them. I remember the day that I learnt I had an understood sphere of acceptable personal space when I was communicating with others. I had just moved to Spain and was teaching 7-year-olds. Parent-Teacher meeting day came around and my Spanish was terrible. I had only been learning for 3 months. I worked hard and prepared my reports in Spanish with the help of my colleagues. I learnt them all off by heart and prayed that nobody asked any follow-up questions. One of my students, an amazing girl by the name of Lucia, was doing great in my classes but not so well in her English classes in her primary school. Understandably, but unfortunately for me, her mother had lots of questions.
She came in and caught me at the end of the meeting. I was standing in the corridor and she walked up stopping at a point that she felt comfortable and we began to have a conversation in my very broken Spanish about her daughter. My unconscious understanding of personal space kicked in and I took a step back. She then took a step forward and I took another back. By the end of the conversation when our odd dance had ended, I was 5 classrooms down the corridor with no idea how I’d gotten there.
From that point onward, I’ve been fascinated by all of the personal and cultural aspects of communication. It’s the little things that we assume is the same for everyone. But unless we discuss it, we often remain unaware that what is understood for one person or culture, can be offensive or shocking for another person. For that reason, I always had regular conversations with my students about how people communicate in their cultures. I never saw it as our job to teach this as such. More to facilitate that conversation so that our students can learn from each other and learn to communicative effectively with people from around the world.
This lesson focuses on greeting and encourages students to reflect on how they greet in their culture and to learn what others expect from a greeting. It’s designed for lower levels (elementary / Pre-intermediate) but as it’s an awareness raising lesson, it could be carried out with higher levels.
Intercultural Communication: Greeting
Level: Elementary / Pre-int (& above)
Time: 90 minutes
Objective: to raise awareness of how people greet in different cultures so that we can greet and have short conversations with people from around the world.
Over the past few months, I’ve been speaking to a lot of teachers about the emergence of AI and its impact on our industry. Reactions have ranged from fear to acceptance to excitement. It’s a really interesting time to be a teacher. I have to say, I understand the fear. For the majority, it’s not about machines rising against us or homicidal interactive whiteboards. For many it’s a fear of the unknown, we just got used to teaching online and now there’s another new piece of software we need to get to grips with, another tool that our students will be more familiar with than us. And that is very understandable.
In answer to that fear, I would say just try it out. Start small and take it from there. You don’t need to be the expert. It’s all about the first step. In this post, we’ll look at making that first step as easy as possible.
What problem can AI help to solve?
An easy first step is finding something you do regularly and explore how AI can help you achieve that more effectively. As a teacher, I remember spending hours scouring the internet looking for the perfect texts to use in my lessons, the perfect dialogue, story, article, etc. I’d come across one and it would be almost perfect but not quite. If you’ve ever had this issue, Artificial Intelligence is going to become your best friend.
For the purposes of this blog, we’re going to use Chat GPT. It’s free, easy to sign up to and easy to use.
What is the objective of your lesson? What kind of text would help you to achieve that objective? Is it a short story, an article, an anecdote, a poem, a dialogue, a text conversation? Whatever it is, Chat GPT will help you to write it.
Step 3: Get your prompt right
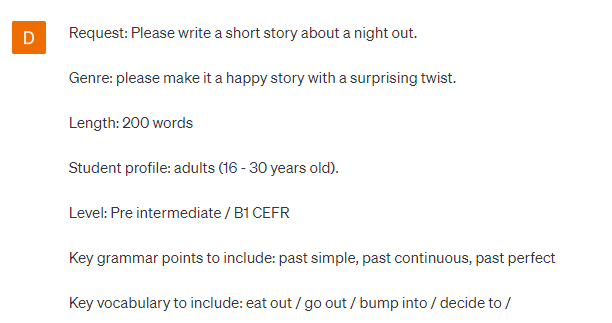
The key to getting the text you want is feeding Chat GPT the information it needs. For example, if you say “write me a story about a night out”, you might get a story that’s 1000s of words long or you might get a very short one. It might be a love story, a horror story, or a combination of both. You’re at the whim of Chat GPT. It’s all about the prompt. To ensure success, include:
Request:
Genre:
Length:
Student profile:
Level:
Key grammar points to include:
Key vocabulary to include:
Step 4: Edit your text
The beauty of Chat GPT is that if you don’t like your text, you can just click “Regenerate” and you’ll immediately get another version. You can also ask Chat GPT to refine your text by feeding it further prompts. For example, you could say: “please make this story shorter” or “please make the vocabulary a little simpler” or even “please rewrite this story in the first person”.
In my experience, you’ll probably still need to edit the story slightly to make it perfect for your specific group of students, but Chat GPT will do most of the heavy lifting for you and will do it in seconds.
Let’s look at an example:
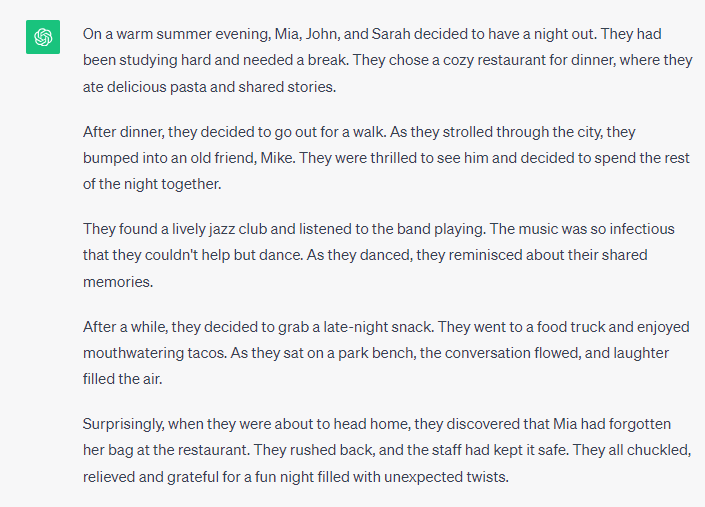
I want to teach a lesson on telling stories using a range of narrative tenses. My topic is nights out. I asked Chat GPT to create a text for me. Using the prompt structure above, I fed it the information it would need.
Chat GPT created the story below, which is a pretty good start but I felt there was some vocabulary that wasn’t really appropriate for this level.
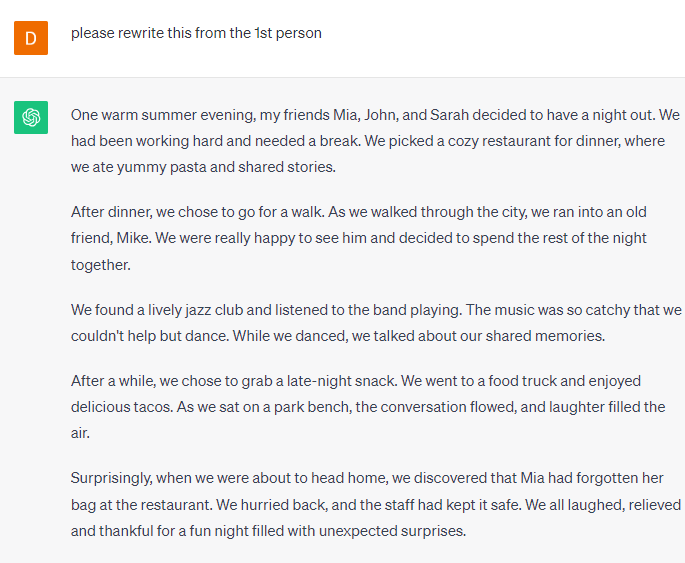
I asked Chat GPT to replace the vocabulary with simpler vocabulary and got the following. This was pretty good but I wanted my students to tell their stories from the first person to better mirror how they tell stories in their real lives.
I asked Chat GPT to rewrite it from the 1st person point of view and thankfully it obliged.
I’ve now got a pretty decent text, at the level I want, in the format I want and the beauty of this is that it took about 2 minutes from start to finish.
A Final Thought:
AI isn’t perfect in any shape or form but it can save you a lot of time when it comes to lesson planning and materials creation, even if it’s just to give you some inspiration. So, before you go scouring the internet for the perfect text, why not take that first step and give AI a go. It’s not as scary as it might seem.
I absolutely love talking about food in class. I love how different cultures describe food, I love how literal some can be and how persuasive and descriptive others are. I love how totally convinced someone can be that the food from their country/culture is superior to another’s. I love the debates that ensue and all the language that emerges as a result. I love how curious everyone is off each other’s food customs. Food can be the gateway to lessons on question formation, circumlocution, descriptive language, instruction giving, debating and in the case of this lesson, writing skills.
This lesson focuses on describing food tastes and while the context is a food blog, the language (describing food and tastes) and the writing skill (organising a paragraph) are easily relatable to a range of speaking and writing contexts.
Details:
Level: Pre-Intermediate / Intermediate
Objective: by the end of the lesson, learners will be able to describe food tastes & write a paragraph that is easy for a reader to follow (e.g. in a blog post about food).
There is one movie trope above all others that really bugs me. You’ll see it occur in almost ever film set in a school. The students are in class, the teacher is explaining some crucial aspect of the lesson, the students are all slumped over their desks or tapping their pens, and then it happens…right in the middle of the teacher’s key input stage the bell goes off and just like that the lesson is over. The students pile out of class while the teacher shouts something along the lines of, “Read pages 40 to 400 and we’ll pick this up tomorrow!”
Then my poor wife has to pause the film and listen to me rant for the next ten minutes:
“But, but, they knew the bell was coming! The lesson is presumably the same length every day. It wasn’t a surprise. Why are they so bad at planning that they are surprised by the bell every day?! What happened in the first half of the lesson that caused them to be so off on their timings that they’re only getting to the main input stage in the final moments of the lesson! HOW IS ANYONE MEANT TO LEARN ANYTHING IN THESE LESSONS?!”
Then we carry on with the film and I silently seethe. Sometimes I ponder one question from my rant: what happened in the first half of the lesson? And sometimes I reflect on my own teaching and realise that while I was maybe never as bad as this movie trope, I was often guilty of front-loading my lessons to the detriment of my lesson objective.
Especially in my early years of teaching, I had a fear. A fear that informed how I planned and taught my lessons. It was a simple fear but if I’m honest, it had a serious impact on my students’ learning. What was it? It was the fear of running out of material before the end of my lesson. This fear of dead lesson time causes me to front-load.
What do I mean by “front-loading”?
If we imagine the average English language lesson will include the following major stages:
Schemata activation discussion.
A reading or listening text.
Comprehension checking questions.
Vocabulary input and practice.
Grammar or skill input.
Controlled practice of the grammar.
Freer practice of the grammar.
Feedback.
Front-loading occurs when a teacher spends the majority of their lesson time on stages 1 to 4, often supplementing with extra readings, listenings, or activities that relate to the topic. While these stages are important, it could be argued that they are the set-up for the input, practice, and feedback stages in which the real learning of the lesson occurs and learners will see real progress. This is not to say that the first stages are unimportant in any way, that set-up and schemata activation is hugely important but when front-loading occurs, it tips the balance of importance in favour of the set-up.
Where does “front-loading” come from?
Much like my early years of teaching, it is born from a fear that we will be left with empty lesson time and nothing to fill it. It comes from the belief that the material we have is not enough for the time we have. In my case this fear and belief persisted despite constant evidence to the contrary, despite always having to squeeze the most important stages of the lesson into the time left over.
How can we avoid “front-loading”?
Simple: plan less, teach more. When I am planning a lesson, I have to force myself not to front-load, not to spend too long on that opening discussion just because it’s interesting. The discussion is not my objective. The second half of the lesson is where the real learning occurs The first half is the set-up for the learning, it is just the context.
Below are some tips I employ to avoid front-loading:
Tip 1: I try to avoid supplementing with topic-based material. My learners might need more input or practice on the target language or skill but they probably don’t need another reading on the topic or another topic-based vocabulary exercise on top of what is already there. Any necessary lexis can emerge throughout the lesson.
Tip 2: Comprehension checking tasks aren’t always crucial to achieving my learning objective. If my objective isn’t to improve reading or listening comprehension, then maybe my lesson time is better spent on practice and feedback. I will often instead focus on the language within the text that will help my learners achieve their objective.
Tip 3: I remind myself constantly that it is ok to have time left over at the end of the lesson because:
Giving students the chance to repeat an activity and improve based on the feedback I’ve given, is an excellent use of class time.
Reflecting on what has been learnt in the lesson is worthwhile and my learners will benefit from this discussion.
Giving students time to consider how they will use the language they’ve learnt outside the classroom can help bridge the gap between the lesson and the real world, which is something I am constantly trying to achieve.
So, if you find yourself spending two thirds of your lesson on the set-up and squashing the actual learning into the final third, then avoid becoming a film trope and plan less, teach more.
Aim: to practice modals of deduction / create opportunities for using them in speaking. Reading practice and vocab building.
Level: Pre-Int / Int / High Int / Upper Intermediate (The lower levels will find it challenging, but that is fine, as long as you tell them it will be, and provide lots of scaffolding and support)
Procedure:
Start with the reading – Part 1.
The aim of the gist is just to get the students thinking about the set up of the story. For me the answers are all in the text except for the 4th question, which is all about opinion. Some students said they were rich, others poor. At this stage that doesn’t matter, but encourage them to justify why they think that. Here is also a place for them to use modals so you could board some examples.
E.g. He’s sat at a desk so they might have a study so they could be rich. / They have two floors so the can’t live in a flat.
She is the dead man’s wife. / widow
They are married
He has died
We don’t know, but see above
Not in London – “she was away in London”
Ask the students to write 3 sentences describing the situation using could / might / must in the present.
The vocab section encourages learner autonomy, try to discourage them from using dictionaries.
a) wrist
b) icily cold
c) slumped
d) tut
e) pulse
Modals:
First use of modals: monitor and board examples, correcting errors and encourage them to think about the pronunciation of have – /əv/
Group feedback – see what the students think – get them to talk to each other in groups.
board examples and correct errors
(Feel free to do other normal textploitation things, such as focusing on the tenses used. I use it to ask the students what the pronouns refer to as I often find these are overlooked.)
Pronouns:
Ask the students to underline the uses of ‘it’ in the text.
The room felt icily cold as she walked into it. Her fingers felt for the light-switch on the wall. It was never where she thought it was. She found it and suddenly the room was bathed in light. Her husband was where he normally was, at his desk. He was slumped over and was sleeping. She walked over to the desk, put the lid onto the open bottle of whisky, and tutted. She didn’t like him drinking so much, but he always did when she was away in London. She ran a hand through his hair. He felt cold. She pushed him back so that she could look at him. It was then that she realised something was wrong. She stared at him, he wasn’t breathing. She grabbed his wrist, no pulse, nothing. Upstairs her son was woken by the sound of uncontrolled screams.
what does each one refer to?
the room
light-switch
the light-switch
the light-switch
the moment she pushed him back
Reflection: Ask students how the text would be different if ‘it’ hadn’t been used.
Extra:
N.B. I was unsure that my students had fully followed all the details of part 1 so I asked them to act it out in small groups, I had 12 so I put them into groups of three, one of them being a director and telling the others what to do. I was surprised how willing they were and it ended up being really good as a way of checking understanding in a different way and gave the class a different feel.
Part 2
Prediction: Encourage your students to take guesses about the victim from the photo and only then let them read the report to check their assumptions.
Students read the police report, take notes and discuss ideas as to what has happened, have their ideas changed?
Checking understanding:
Ask students to decide if the following questions are true or false – ask them to try to answer from memory – they can check after.
He has been married once.
He sometimes plays golf.
He owns a company making computers.
He is well off.
Answers:
false
false – he is a keen golfer and member of the club, probably plays more
false – distributes components / parts
true – owns two houses
Vocab:
Read the forensic report and ask them to match the definitions to the words in the text.
a) the deceased
b) appeared
c) condition
d) intruder
e) other substances
f) laboratory
Listening:
Ask the students to take notes and then compare them in groups. I played the recording 3 times.
Then ask them to decide which pieces of information was the most important for the case.
Below is the tapescript with the sections I think most important underlined
Hi is that the chief inspector? Good, good. This is Laura Donavon from the lab. Right, I have some information for you. Mr Brown did not die of natural causes. In fact, from the tests we’ve carried out on his body we are 75% sure he died of poisoning. Yes, I know. We examined the crystals in the glass and it was definitely poison. Now, this is the really interesting bit. We think it was cyanide, and I know what you are thinking, but let me tell you a bit about cyanide. It can be swallowed, inhaled, or absorbed through the skin and it stops people being able to take in oxygen, causing an ‘internal asphyxia’. The victim suffocates to death as he breathes in oxygen he cannot use. Yeah, not very nice is it. Yeah, yeah, effects are almost immediate. Oh, and you might want to know something about this, it can be made from the stones of fruits as well as from chemicals, so something for you to think about there. Yeah, good luck with the enquiry.
Reflection:
Once the students have understood this, ask them to reflect on what they know so far and what they think may have happened now.
More to come soon and let us know what you think.
P.S. thanks to Jess for recording the text for me. x
So we finally have it, Barry London’s second official lesson. If you haven’t seen the previous one it’s right here. The idea we came up with was that seeing as how for some reason every character in my lessons is called, Barry, we’d just embrace this and create a person and give him a string of lessons. They’re for different levels and will look at different aspects of the language. Also, they do not need to be done in any sequence. They do not build on each other.
This one is very different to our normal lessons in that it looks at descriptive writing and study skills in more detail than we normally would. It started out as a low level lesson but it was most definitely a high level one by the end.
I’d recommend this lesson as something different to do at the end of the week or course or for more creative students. It’s definitely not a straight grammar lesson.
Level: Upper Intermediate / Advanced
Time: 2 – 3 hours
Objective: to encourage sts to record language in context and to think about metaphors and imagery in creative writing.
OK Once is not actually my favourite film but it’s not bad at all. I was in the middle of a lesson the other day and this was the only film I could think of. I did this lesson (or a version of it) and it went really well.
It’s a simple low-level lesson and if you do similar lessons or activities little and often, you really will begin to get slightly more autonomous students. The whole idea is to encourage them to notice the language that’s all around them just a little bit more.
In this case, they have a tiny text but they’re going to use it to notice 3 language points as well as working on noticing errors and getting the meaning of vocab from context.
Level: elementary / pre-intermediate
Time: 1 – 3 hours
Objective: to encourage sts to notice language in context
If you’re looking for some more film related lessons try this one or this one.
Tip: If a film comes up in class that your students don’t know, do a research hunt. Give them 3 minutes and send half the class to IMDB and half to Wikipedia and then see what they come up with. It’s great for practising independent research skills.
So this is the second and last of the “bits of the paper we ignore” series. This one is based on my personal favourite, Rush Hour Crush. If you don’t know what this is, I suggest you check it out. Each morning on the way to work lovely people hand me a copy of the free newspaper, The Metro. It’s mostly awful (but actually very useful for the classroom as the articles are not that difficult or long) but I do love the Rush Hour Crush section.
The idea is that commuters see people they fancy on the tube or a train or bus and they write a text to that person and send it to The Metro who prints it in the paper. It’s sooooo creepy and weird and hilarious and absolutely choc full of lovely vocab and noun phrases. Great fun for the classroom. So, if you don’t live in London, I shall bring London to you in all of its creepy glory. Enjoy!
Level: Intermediate and above
Time: 1.5 – 3 hours (depending on activities)
Objectives:
to encourage students to write more complex sentences, using noun phrases
to encourage students to notice the English around them and to ask questions of it
This is reasonably straightforward but I’ll take you through it step by step:
Gist reading: students skim the text for 30 seconds and discuss what it is and where it is from.
Independent research skills: If possible, students Google and search for the text online to check their ideas.
Engaging with the text: Students discuss the concept and share their initial impressions.
Second reading: Students match the texts to the descriptions (see answer sheet)
Vocab focus 1: students match the words/phrases from the text to the definitions given.
Vocab focus 2: using the context and the vocab from the previous exercise, students try to decide what the phrases mean.
Language focus:
students read the definition of a noun phrase (feel free to change this definition for one of your own).
students identify the noun phrases in the examples from the text (see answer sheet)
students examine them further and find specific types of noun phrase.
check as a group and discuss any issues
Students (in pairs) compete to write the longest complex sentence using noun phrases.
Follow-up
What I would do (especially if you’re living in this country) is get students to write their own Rush Hour Crush texts and send them in. Even if you can’t send them in, get students to write them and make a poster. This is a lovely way to finish things off as it practises all of the target language and will lead to tonnes of new vocab and some lovely error correction before the texts are ready to be sent or put on a poster.
This is to be part 1 of a 2 part series focusing on the bits of the newspaper we throw away. A lot of our lessons on this blog and the lessons we do in class use articles as the basis for the lesson. But what about the rest of the paper?
We want to encourage our students to be fully-functioning autonomous machines out in the real world, constantly analysing the English around them, learning new words and structures and reconfirming what they have learnt before. One way to do this is to help them find what they should be analysing in the first place.
This first lesson looks at an advertisement for a film. It’s a film I haven’t seen a to be honest I have absolutely no intention of seeing ever…but that doesn’t matter. Check out the lesson and let me know how it goes.
Level: Intermediate and above (although low-ints might need some help with some of the questions on the worksheet. A lot of ICQs and CCQs please!)
Time: 1 – 2 hours (depending on discussion times and follow-up activities)
Aim:
to encourage sts to notice and analyse the language in the world around them.
This is quite a straight forward lesson. The worksheet takes you through it nice and easily. I think the only part that might need to be commented on is the final part, the reflection. The idea here it to get them thinking about the English that surrounds them. Even if you don’t live in an English speaking country, the Internet is at your disposal and by driving them to sites like IMDB.com, you can help them to see this.
Possible Follow-up Activities:
students write their own tweets about bad dates (real or imaginary) and either put them up around the room for correction or tweet them using the hashtag at the bottom of the ad.
Students look up new films in groups on IMDB and summarise them to their partners.
Students set up a class online dating profile and send comments to people.
At our school we offer weekly free pronunciation lessons to all of our students. We get quite a lot of students attending each week and some of them come week on week but for others it’s their first week. This means we need to come up with new ideas all the time, building on the previous week but ensuring that new students can join at any time and not be lost. We also need to design lessons that span all levels from Elementary to Advanced (sometimes Beginners attend but not so often).
My favourite thing to look at in these classes is connected speech for the following reasons:
All students from Elem to Adv need it.
Most of them haven’t come across it in their countries so it is usually new, even for Adv.
We need to raise awareness of features of connected speech over and over if sts are to be able to understand native English speakers.
They love it!
The easiest way for you to get to grips with it is to teach it.
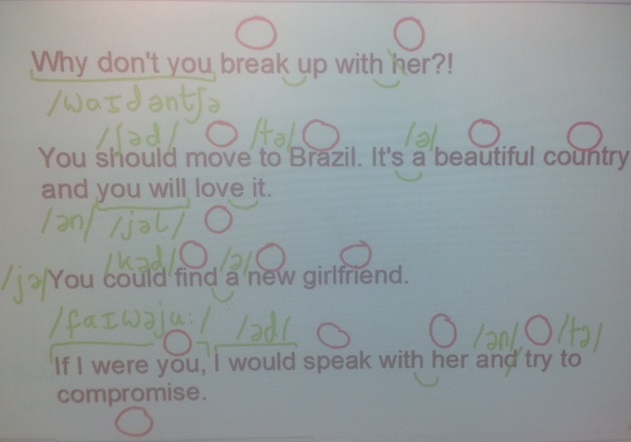
In the teacher’s worksheet below, I have included my own boardwork so that you can visualise what I’m talking about.
NB: don’t panic if you don’t know the phonemic chart off by heart. Highlight where linking occurs and model any other connected speech that comes up. You don’t need the phonemic symbols (but they do help).
Level: All levels
Time: 60 – 90 minutes
Topic: advice (almost every level has come across 1 or 2 ways of giving advice).
Display the discussion questions from the worksheet and allow sts to discuss them in small groups. Discuss as a whole class (see possible answers on the teacher’s sheet).
Tell the students that you will be talking about giving advice today. In groups ask them to brainstorm different forms for giving advice.
Tell them your problem. I usually use the one below but feel free to improvise.
Ask the students to write one or two pieces of advice per group using the different forms from part 2.
Write them up on your board, 1 from each group. Ensure that they have used the advice forms from above. If they have all used “should”, reformulate their ideas as a class so that you have some variety on the board.
These pieces of advice are what you’re going to analyse for features of connected speech.
NB – don’t panic! you don’t need to be a pro at connected speech, just follow the steps below.
Ask students to underline which words they think will be stressed in each sentence. Check as a class.
Say each sentence out loud as you would normally and ask students what happens to the other (unstressed) words in the sentence. e.g. are they weaker? are some words connected? do some sounds disappear?
As the same things happen in each sentence, draw your sts attention to the patterns. E.g. “to” is usually pronounced = /tə/ & “and” is usually pronounced /ən/.
Drill each sentence with the class.
Ask sts to examine the sentences and try to find common patterns.
Get sts to fill in the Sentence Pronunciation Guidelines on their worksheets.
Check together.
Help me, I need some advice!
My girlfriend came home last night and told me she wanted to move to Brazil. She says she is sick of London and needs a change. The problem is that I have friends here, I have a job, my family live close to here.
I would love Brazil, it sounds amazing but now is not the time to move. I’m scared if I say no that it will be the end of our relationship.